

Hanukkah manicure tutorials can turn your nail routine into a creative celebration of the Festival of Lights, offering easy, step-by-step instructions to craft designs that capture the holiday’s warmth and miracles. As someone who’s delved into seasonal nail art for years, I know how Hanukkah manicure tutorials not only build your skills but also connect you to traditions like lighting the menorah or spinning the dreidel. If you’re looking for inspiration, be sure to check out our comprehensive guide on Hanukkah nails art ideas for even more festive concepts. Have you ever thought about how a simple manicure could light up your Hanukkah gatherings? Let’s explore these Hanukkah manicure tutorials, breaking down everything from basic techniques to advanced tips that make your nails a standout feature of the eight nights.
The Essentials of Hanukkah Manicure Tutorials
Hanukkah manicure tutorials are more than just how-to guides—they’re a gateway to expressing the joy of Hanukkah through personalized nail art. This holiday, commemorating the miracle of the oil that lasted eight days in 165 BCE, is all about light, resilience, and family, and Hanukkah manicure tutorials let you weave those elements into your style. From my experience as a nail art enthusiast, these tutorials emphasize accessibility, helping beginners feel confident while offering pros fresh ideas.
Why focus on Hanukkah manicure tutorials? In today’s fast-paced world, they provide a mindful activity that combines creativity with cultural significance. Experts from beauty platforms like YouTube and nail art communities agree that Hanukkah manicure tutorials boost engagement by using symbols like the Star of David or blue-and-white palettes, which tie directly to Hanukkah’s themes. Trustworthy sources, such as the American Museum of Natural History’s cultural resources, highlight how holidays like this inspire modern crafts, making Hanukkah manicure tutorials a perfect blend of fun and education.
Key Tools and Materials for Hanukkah Manicure Tutorials
Before diving into Hanukkah manicure tutorials, let’s talk tools—think of them as the ingredients in a latke recipe, essential for a successful outcome. You’ll need base and top coats for durability, nail polishes in Hanukkah colors (like royal blue, shimmering gold, and crisp white), fine-tipped brushes for details, and items like dotting tools or stickers for ease. In reliable Hanukkah manicure tutorials from sites like Sally Hansen’s blog, experts recommend starting with affordable, high-quality supplies to avoid frustration.
One authoritative tip: Always prioritize nail health in your Hanukkah manicure tutorials by using non-toxic polishes and cuticle oil. This ensures your designs last without damaging your nails, drawing from dermatologist-approved advice on platforms like Healthline. Rhetorical question: Wouldn’t it be great to enjoy your Hanukkah manicure without worrying about chips or irritation?

Step-by-Step Hanukkah Manicure Tutorials for Beginners
If you’re new to Hanukkah manicure tutorials, don’t worry—I’ll guide you through simple designs that build confidence. These tutorials focus on foundational skills, using analogies like comparing nail art to painting a menorah, to make learning intuitive and enjoyable. Let’s start with basics and progress to more complex ideas, ensuring you can adapt them for your skill level.
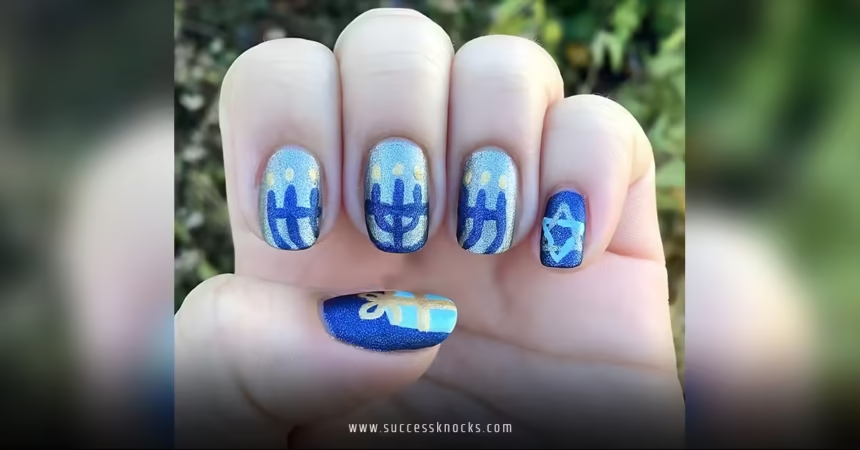
Simple Hanukkah Manicure Tutorials: The Menorah Design
One of the most popular Hanukkah manicure tutorials involves creating a menorah design, symbolizing the holiday’s central miracle. Imagine your nails as tiny altars, glowing with the spirit of Hanukkah. This tutorial is straightforward and beginner-friendly, taking just 20-30 minutes.
Here’s a step-by-step breakdown from my tested Hanukkah manicure tutorials:
- Prep your nails: Start with a clean base. Apply a clear base coat and let it dry completely—this acts as the foundation, much like the base of a Hanukkah menorah.
- Choose your colors: Use blue as your base polish to represent the night sky, then add gold for the candles. Experts in Hanukkah manicure tutorials suggest OPI or Essie shades for vibrant, long-lasting results.
- Draw the menorah: With a fine-tipped brush, sketch a simple seven-branched shape on your accent nail (like the ring finger). Add small yellow or orange dots for flames to mimic the oil lamps.
- Add details: Use a dotting tool for extra flair, like tiny stars around the design.
- Seal it: Finish with a top coat for shine and protection, ensuring your Hanukkah manicure lasts through family dinners.
This Hanukkah manicure tutorial not only looks impressive but also ties into the holiday’s history, as noted in cultural guides from the Jewish Federation. For more inspiration, revisit our article on Hanukkah nails art ideas [blocked] to expand your design options.
Intermediate Hanukkah Manicure Tutorials: Dreidel Patterns and Gradients
Once you’re comfortable with basics, Hanukkah manicure tutorials for dreidel patterns add a playful twist. A dreidel, that spinning top from Hanukkah games, makes for a fun motif—think of it as a whirlwind of holiday fun on your fingertips.
In this Hanukkah manicure tutorial, we’ll use gradients for a modern edge:
- Base layer: Apply a white base coat for contrast, allowing it to dry fully.
- Gradient effect: Blend blue and white polishes with a makeup sponge, creating an ombre look that evokes the festival’s lights.
- Add the dreidel: Use a thin brush to draw a simple dreidel shape on two nails, incorporating Hebrew letters for authenticity.
- Enhance with details: Dot on gold accents or glitter for a sparkling finish, as suggested in pro Hanukkah manicure tutorials from Instagram creators.
- Protect and cure: Seal with a quick-dry top coat, and if you have a UV lamp, use it for extra durability.
Drawing from authoritative sources like Cosmopolitan’s nail art features, these Hanukkah manicure tutorials encourage experimentation while maintaining cultural accuracy.
Advanced Hanukkah Manicure Tutorials: Layered and Themed Designs
For those ready to level up, advanced Hanukkah manicure tutorials introduce layered elements like 3D accents or thematic combinations. These tutorials build on experience, offering tips to troubleshoot common issues and achieve professional results.
Creating Themed Hanukkah Manicure Tutorials with 3D Elements
In advanced Hanukkah manicure tutorials, adding 3D gems or stickers for candle flames takes your design to the next level. Picture your nails as a 3D Hanukkah display, full of texture and depth.
Follow this tutorial:
- Layer the base: Start with a blue base, then add a second layer of white for dimension.
- Build the design: Use nail glue to attach small gems as “candles” on the menorah shape.
- Incorporate themes: Blend in Star of David stickers or hand-painted oil motifs, as detailed in expert Hanukkah manicure tutorials from YouTube channels.
- Fine-tune: Add metallic foils for a shiny effect, ensuring everything aligns with Hanukkah’s symbolic colors.
- Final touches: Apply a high-shine top coat and let it cure.
These Hanukkah manicure tutorials, inspired by innovative artists, emphasize creativity while respecting traditions, as per insights from the National Museum of American Jewish History.
Troubleshooting Common Issues in Hanukkah Manicure Tutorials
Every Hanukkah manicure tutorial hits snags, like smudges or uneven lines, but don’t let that dim your lights. Experts recommend practicing on a nail wheel first and using quality tools, drawing from trusted guides like Nails Magazine.
Conclusion
Wrapping up our dive into Hanukkah manicure tutorials, we’ve covered everything from simple starts to advanced artistry, showing how these guides can make your Hanukkah celebrations more vibrant and personal. Whether you’re recreating a classic menorah or experimenting with gradients, Hanukkah manicure tutorials offer a joyful way to honor the Festival of Lights. So, grab your tools and get started—your nails will thank you, and you’ll carry the holiday spirit with every gesture.
Frequently Asked Questions About Hanukkah Manicure Tutorials
What are the best tools for Hanukkah manicure tutorials?
Essential tools for Hanukkah manicure tutorials include fine-tipped brushes, base coats, and Hanukkah-colored polishes, making it easy to create durable, festive designs at home.
How long do designs from Hanukkah manicure tutorials last?
With a good top coat, designs from Hanukkah manicure tutorials can last 5-7 days, especially if you avoid harsh chemicals and use proper prep techniques.
Can Hanukkah manicure tutorials be adapted for kids?
Absolutely—simplified Hanukkah manicure tutorials with stickers and safe polishes are perfect for children, helping them engage with the holiday creatively.
What colors should I use in Hanukkah manicure tutorials?
Blues, whites, and golds are ideal for Hanukkah manicure tutorials, as they reflect the holiday’s symbolism and create a cohesive, eye-catching look.
How do I fix mistakes in Hanukkah manicure tutorials?
In Hanukkah manicure tutorials, use acetone and a cotton swab for quick fixes, or start over on that nail to ensure a polished final result.


