Powerlevel10k installation guide starts here: If you’ve ever felt your terminal prompt is stuck in the stone age—plain text, no colors, no useful info at a glance—then setting up Powerlevel10k (p10k) will feel like upgrading to a sports car. This blazing-fast Zsh theme turns your command line into a customizable powerhouse, showing Git status, directory context, and more without any lag. In this comprehensive powerlevel10k installation guide, we’ll walk you through every step, from prerequisites to advanced tweaks, so you can get it running smoothly on macOS, Linux, or Windows via WSL.
Why bother? Because once installed, p10k’s configuration wizard makes personalization effortless, and pairing it with the right styles unlocks stunning visuals. Curious about those styles? Check out our detailed roundup of the best zsh themes for powerlevel10k 2025 to see what’s possible in the latest setups.
Look at that—various high-contrast prompt styles in action. That’s the kind of eye candy waiting for you after following this powerlevel10k installation guide.
Prerequisites for Powerlevel10k Installation
Before diving into the powerlevel10k installation guide proper, ensure your system is ready. You need Zsh as your shell—it’s more feature-rich than Bash and essential for p10k.
- On macOS: Zsh is pre-installed (version 5.8+ in recent releases). Verify with
zsh --version. - On Linux: Most distros have it; install via
sudo apt install zsh(Ubuntu/Debian) orsudo dnf install zsh(Fedora). - On Windows: Use WSL2 with Ubuntu for the best experience.
Next, a Nerd Font is crucial for icons and Powerline symbols. The recommended one is MesloLGS NF—download it from the Nerd Fonts website and install by double-clicking the files.
Without a proper Nerd Font, you’ll see question marks or broken glyphs. Pro tip in this powerlevel10k installation guide: Install the font before configuring p10k to access all styles.
Many users pair p10k with Oh My Zsh for plugins and ease. If you don’t have it yet, we’ll cover that next.
Installing Oh My Zsh (Recommended for Beginners)
Oh My Zsh supercharges Zsh with themes, plugins, and auto-updates. It’s not strictly required for this powerlevel10k installation guide, but it makes life easier.
Run this one-liner:
sh -c "$(curl -fsSL https://raw.githubusercontent.com/ohmyzsh/ohmyzsh/master/tools/install.sh)"Follow the prompts—it’ll set Zsh as your default shell if needed. Restart your terminal afterward.
Now you’re primed for the core of our powerlevel10k installation guide.
Step-by-Step Powerlevel10k Installation Guide with Oh My Zsh
This is the most common path in any solid powerlevel10k installation guide.
- Clone the repository:
git clone --depth=1 https://github.com/romkatv/powerlevel10k.git ${ZSH_CUSTOM:-~/.oh-my-zsh/custom}/themes/powerlevel10kThe --depth=1 keeps it lightweight.
- Edit your
~/.zshrcfile (usenano ~/.zshrcor your favorite editor):
Find the line ZSH_THEME="robbyrussell" (or whatever it is) and change it to:
ZSH_THEME="powerlevel10k/powerlevel10k"Alternatively, automate it:
sed -i '' 's/ZSH_THEME=.*/ZSH_THEME="powerlevel10k\/powerlevel10k"/' ~/.zshrc  # macOS
# Or for Linux:
sed -i 's/ZSH_THEME=.*/ZSH_THEME="powerlevel10k\/powerlevel10k"/' ~/.zshrc- Restart your terminal or run
source ~/.zshrc.
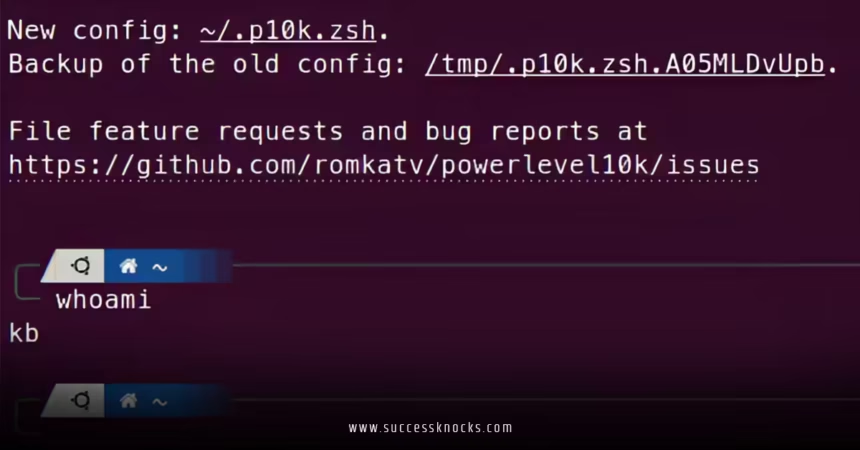
Boom—the configuration wizard launches automatically!
This wizard is the highlight of any powerlevel10k installation guide. It asks about your preferences: diamond icons or unicodes? Many colors or few? Transient prompts? Answer honestly—it generates ~/.p10k.zsh tailored to you.
Rerun anytime with p10k configure.
Manual Powerlevel10k Installation Guide (Without Oh My Zsh)
Prefer a vanilla Zsh setup? This powerlevel10k installation guide variant keeps things minimal.
- Clone to a directory:
git clone --depth=1 https://github.com/romkatv/powerlevel10k.git ~/powerlevel10k- Add to
~/.zshrc:
echo 'source ~/powerlevel10k/powerlevel10k.zsh-theme' >> ~/.zshrc- Source it and run the wizard as above.
For framework users (Prezto, Zim), check the official Powerlevel10k GitHub for specific lines.
Configuring Your Terminal Emulator
Post-installation in this powerlevel10k installation guide, tweak your terminal:
- iTerm2 (macOS): Preferences > Profiles > Text > Font > Select MesloLGS NF.
- Kitty/Alacritty: Update config files with the Nerd Font.
- Windows Terminal: Settings > Profiles > Appearance > Font face.
Enable “Instant Prompt” in the wizard for zero startup delay—p10k’s secret sauce.
See how informative yet clean that prompt is? That’s post-powerlevel10k installation guide magic.
Adding Essential Plugins
Elevate your setup beyond the basic powerlevel10k installation guide:
Clone these into ~/.oh-my-zsh/custom/plugins:
git clone https://github.com/zsh-users/zsh-autosuggestions ${ZSH_CUSTOM:-~/.oh-my-zsh/custom}/plugins/zsh-autosuggestions
git clone https://github.com/zsh-users/zsh-syntax-highlighting ${ZSH_CUSTOM:-~/.oh-my-zsh/custom}/plugins/zsh-syntax-highlighting
Add to plugins in ~/.zshrc:
plugins=(git zsh-autosuggestions zsh-syntax-highlighting)They provide auto-suggestions and command highlighting—game-changers.
Common Troubleshooting in Powerlevel10k Installation Guide
- Broken icons? Reinstall Nerd Font and rerun
p10k configure. - Wizard not starting? Run
p10k configuremanually. - Slow prompt? Unlikely with p10k, but disable heavy segments in
~/.p10k.zsh. - Sub-pixel issues? Tweak terminal anti-aliasing.
For deeper dives, the official docs are gold.
Advanced Customizations After Installation
Once comfortable with this powerlevel10k installation guide, edit ~/.p10k.zsh directly—it’s heavily commented. Add segments for battery, AWS context, or Kubernetes.
Want inspiration? Explore community configs or revisit the best zsh themes for powerlevel10k 2025 for trending styles like Lean or Rainbow.
Why Powerlevel10k Remains Top-Tier in 2025
Even with newcomers like Starship, p10k’s maturity, speed, and Zsh-native features keep it dominant. This powerlevel10k installation guide proves how quick and rewarding the setup is.
Conclusion
Following this powerlevel10k installation guide, you’ve transformed your terminal from mundane to magnificent. With the wizard’s help, Nerd Fonts, and a few plugins, you’re now equipped for efficient, beautiful shell sessions. Experiment, tweak, and enjoy the productivity boost. Your command line will thank you—and so will your future self during those late-night coding sessions.
Ready for more? Dive into the best zsh themes for powerlevel10k 2025 to fine-tune your new setup.
FAQs
1. Is Oh My Zsh required for this powerlevel10k installation guide?
No, but it’s highly recommended for easier plugin management and updates during powerlevel10k installation.
2. How do I rerun the configuration wizard in this powerlevel10k installation guide?
Simply type p10k configure in your terminal—perfect for tweaking after initial setup.
3. What font should I use following the powerlevel10k installation guide?
MesloLGS NF is the top choice; download from Nerd Fonts for full icon support.
4. Can I use this powerlevel10k installation guide on Windows?
Yes, via WSL2—install Ubuntu, follow the steps, and pair with Windows Terminal.
5. How does powerlevel10k relate to the best zsh themes for powerlevel10k 2025?
P10k’s built-in styles are the core “themes”—see our guide on best zsh themes for powerlevel10k 2025 for the latest favorites.